Etere Installation Manual
04 November 2009This document has been developed to provide information on how to carry out the software install preparation, as well as the installation process itself.
Etere Installation Guide
Introduction
The purpose of this document is to complement the Etere's installation package, providing information on how to
prepare the software installation, as well as, the installation process itself, following you can find a brief
introduction to this chapter:
· Preliminary considerations: Provides technical specifications and the minimum hardware and software requirements for the PC's on which Etere will be installed,
· Installing Etere: Illustrates on how to install for the first time an Etere system in a fairly easy way,
· Upgrading Etere: Explains accurately how to carry out the upgrade of an Etere system,
· Network Security Policies: Guide the TX manager through the security design of its network.
Preliminary Considerations
Etere Requirements
SQL Database
Microsoft SQL2008/SQL2005 is the ETERE basic requirement for any configuration. Any ETERE installation
package is provided with a free SQL EXPRESS license, compatible to any available MS SQL service pack. Actually, ETERE requires regular service pack updates. SQL EXPRESS License limitations can change any time according to Microsoft policies. Up to now, Microsoft limits the SQL EXPRESS to configurations with a maximum of 5 PC's connected to the SQL . All the ETERE users must have got permissions to read and write the ETERE databases. The rights to access the SQL database are given by either Ms Windows login or SQL login. The former, Ms Windows login, ensures low security levels but an easier way to access SQL. The latter, SQL login, ensures high security levels; any single user is provided with his own SQL username and password; only administrators can read Login data; Users' permissions are set on each PC using the ETERE Main Configuration Screen.
User Permissions
Users must have the Proper ETERE rights set on their PC. Administrator permissions are required during installation only when an update occurs. Any ETERE application needs Read/Write permissions to access …\program files\ETERE. Actually, ETERE writes logs in the folders: …\program files\ETERE\logs or …\program files\ETERE\user.xxx\logs.
Operating System
ETERE supports the following platforms:
- Windows XP professional
- Windows 2000
- Windows 2003 server
- Windows 2008 server
Sometimes, previously mentioned platforms don't display some features usually related to multimedia; then the
OS needs to be updated to the latest MS Service Pack. Etere requires also .net framework 2.0 or more installed.
Installation Directory
Etere suggest to create one installation directory in one Pc and share it. If the system is installed in a LAN
environment, all the client installation can be performed from this shared directory. The Installation directory can be the CD itself, but we suggest to use a directory, because it's more easy to share
the updated files, without burning a new CD. The installation directory sharing must be' read only'
WAN Environment
In a wan environment the remote PC can be installed locally from the original CD. Any update must be performed
with a new CD or downloading the new files.
Hardware
For detailed information regarding the minimum and recommended hardware required for running an Eteresystem, please refer to the chapter Etere Hardware Specifications.


 Etere Installation Manual.pdf


installation on your PC which can be launched from the top CD menu and will guide you through an easy-tofollow
process to carry out the installation of the Etere's software. If you wish to create a shared installation directory, go to advanced installation. Furthermore, remote users can be installed from the same Etere CD, and any update can be carried out also form it, this will simplify the installation and update process over slow WAN lines.
Microsoft SQL Server Installation
Since ETERE System uses a database approach to store and manage safely all the broadcasting data, it is needed to have Microsoft SQL and the latest windows service pack installed on the PC before installing Etere, the recommended versions are Microsoft SQL Server 2005 or 2008 (Express, Workgroup, Standard or Enterprise edition), the most important differences and limitations between each edition in terms of scalability, performance and manageability can be appreciated in the Microsoft's related page. You are always free to contact the Etere support team, who will help you to determine which edition of Microsoft
SQL is better for your system.
How to Install Microsoft SQL Server 2005 Express Edition
In order to install Microsoft SQL Server 2005 Express Edition you must have Administrator rights and the following software must be already installed:
· .NET Framework 2.0 (You can use Control Panel > Add/Remove Programs to see your .NET Frameworkversion)
· Windows Installer 3.1 (To check your Windows Installer version, click Start > Run. Then type: msiexec /?)
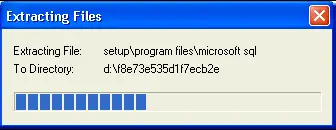
1. On the Etere CD that you have received, you can find a free redistribution version of Microsoft SQL Server 2005 Express Edition (SQLEXPR.EXE), double-click it to begin the installation. Required installation files will be unpacked before installation commences. 2. Accept the licence agreement then click 'Next'. Required setup support files will be installed after clicking
on 'Install' in the Installing Prerequisites window. 3. Click Next to continue. SQL Server Setup will scan your PC for existing installs and will present you with a
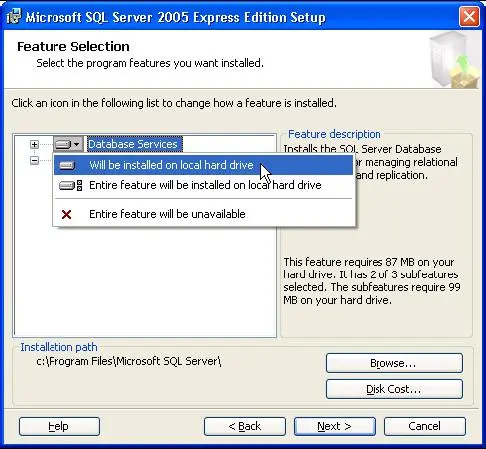
Welcome screen. Click Next again to proceed. 4. In System Configuration Check click 'Next' once this has finished. 5. Enter your registration information and then click Next, from the feature selection list make sure Database
Services is selected for installation. 6. Etere doesn't require the additional features to be installed. Click Next to continue. 7. You should now choose an instance name for the database server. You can leave this as the default 'SQLEXPRESS' or choose an instance name of your own, for example the name of your Broadcasting Station. Click Next to continue. 8. Now choose the authentication type. This relates to the database logon authentication, not ETERE user authentication. After choosing the authentication method here, ETERE can be installed using either method, but if you use Mixed Mode authentication you will need to make a note of your chosen 'sa' password. For ease use Windows Authentication Mode. Click Next to continue. 9. Optionally enable error and usage data reporting, then click Next to continue. 10. Click Install to begin installation. Files will be installed, you'll see green checkmarks next to each component as it installs successfully. If the installation is successful you will see the screen shown below. Click Next to continue. 11. In the Setup Progress window, click Next then Finish to end the installation process. Your database server
is now installed and ready to be used with ETERE. 12. When restarting the computer, for checking if the SQL service works just open the Microsoft SQL Server
13. After you have installed Microsoft SQL Server 2005, you need to create a new database. This database will be used to archive all data and information groups by tables necessary for Etere to work. You can create this database using the utility Microsoft SQL Server Management Studio, just by making right-click on the 'Databases' item from the options tree, selecting 'New Database', giving it a name and after clicking OK the database will be created. 14.Once all these steps have been completed, Microsoft SQL Server will be ready to be used with Etere.
to functions and contains information of the installing process, such as the installing sequence, the folders'
destination paths, the system dependences, the options to install, and some features to check the installation
process. Even after the installation, the installer is still used by Windows each time you add/remove modules or
repair damaged or absent files.
In order to install Etere software, you need to launch the Setup.exe application, select the proper option,
and follow the procedures below:
Etere Installation
1. Select the 'Etere Installation' option, and 'accept the terms in License Agreement', after then click on the
'Next' button,
2. Define the installation folder (e.g.: C:\PROGRAM FILES\ETERE\), and select the modules you want to be installed: 3. Click on the 'Next' button and all Etere files will be copied from the network folder (e.g.:
\\NetworkPath\ETERE\SYSTEM\) to the specified installation folder.
4. Once the installation has finished, launch the 'Start | Programs | Etere Configuration' module and follow
the instructions until the form shown on the picture 'New Licenses installation' appears
5. You will have to browse Etere's software license. If you can't find the folder on the Etere installation CD-
Rom, use the floppy disk containing the license file. In this case you must select the drive A: to the item
Path and select the file 'licenseX.sys'. 6. Once the license has been installed, the next step is to configure the parameters of the database in Etere,
in order to carry out this process follow the next instructions:
· Launch again the 'Start | Programs | Etere Configuration' module, then select 'Settings -> System' option and set the following parameters:
- SQL Server, it is the name of the server on which the database is stored,
- Database, indicate the name of the database to be used,
- Authentication, it could be either Windows (it's advised if the system has no WAN connection and the security requirements are not very strict) or SQL (if the system is connected to a WAN Network, this method gives better security even if it's more difficult to maintain). - Language, select the language you intend to use (in case it is an Unicode language, please consult the How to use Etere with Unicode Languages chapter).
After modifying the parameters, restart Etere Configuration. · Before starting to work with Etere, is strongly recommended to run System maintenance option. This function is available in the main menu of the Etere Configuration module and it creates all the tables needed to run Etere. Features Installation
Use this option to install any of the web services offered by Etere (e.g.: 'Etere Web', 'Tapeless Reception', etc) and that you are licensed to use. In order to install one or more of these services, just tick-off the relative checkbox and click on the 'OK' button
1. Install the desired Unicode language on the PC:
· Click on START | Settings | Control Panel | Regional and language options,
· In the Languages section, enable "Install file for complex script and right-to-left languages (including Thai)" or "Install file for East Asian languages" on the basis of the language you want to use. 2. Add the keyboard in the desired language from "Text services and input languages",
3. Select the desired language under Etere Configuration,
4. Check that the keyboard used is in the language that you need when you're using Etere. NB: All the information above concerns Microsoft Windows XP.
Etere counts with a professional staff of engineers which constantly works to develop a cutting-edge software
according to the latest needs of the broadcasting industry, in this way, Etere is able to offer to its customers the
most recent updates of its product, that can be download from the Etere's website and easily installed by customers themselves. Upgrading an Etere system is a sensitive process, so remember that an upgrade should be performed only if version 19.x of ETERE is currently installed on your system, otherwise it may crash. If it is not your case, because you have an earlier version of Etere, please feel free to contact our Customer Support that will be able to help you with any question you have.
Step-By-Step Procedure
The upgrade instructions described below will provide you with a walk-through that will assist in upgrading the
ETERE Software, this upgrade requires approximately two hours of time to download the needed files and another hour for installing all the required components; the following steps needs to be followed for a successful upgrade of your ETERE software:
1. Prepare your System
1.1. Identify the SQL Server version to check its compatibility with ETERE, including the service pack level required. The SQL version can be checked in the 'ETERE Configuration | Help | About |Properties' window. 1.2. If the SQL version does not meet the suggested requirements, update it. 1.3. Identify the Operating System, Framework version and service pack level of each PC to check its compatibility with ETERE. This can be checked in the 'ETERE Configuration | Settings | Etere PC's' window. 1.4. Runs Windows Update in all PC's that do not meet the recommended requirements for Operating System and Framework version,
1.5. Identify all PC's where ETERE is installed. This can be done in 'ETERE Configuration | Settings | Etere Installation',
1.6. Make a list of all PC's that need to be updated, and create a backup copy of the existing ETERE system folder. 1.7. Determine all the changes that have been made between your current ETERE version and the new one following the next procedure:
1.7.1. Launch from the ETERE network folder the file 'eterever.exe' (e.g.: '[networkpath\ETERE\SYSTEM\eterever.exe'). 1.7.2. Select the ETERE network folder (e.g.: '[networkpath]\ETERE\SYSTEM\eterever.exe') path and press he 'Generate Version History' button,
1.7.3. A file named 'version.txt' will be generated in the given location and all executable and DLL information will be listed in it. 1.7.4. Send this file (version.txt) to support@etere.eu specifying that you wish to have a report on all relevant changes for comparison. 1.7.5. Etere's support team will send you a report containing the changes between your current
version and the new release detailing the new features that an upgrade will bring to your system. 1.8. Make a backup of your database (see the SQL Database Backup chapter for further information). 2. Download the Upgrade
2.1. Enter the Customer Area of the ETERE website (www.etere.eu), and insert your login data (only
customers who have paid the annual licence fee are allowed to download upgrades). 2.2. From the list to the left of the screen click on the 'Software Upgrades' option and select the
'Download ETERE full upgrade' to download the file containing the latest version (EtereLast.exe),
2.3. Make double-click on the file 'EtereLast.exe' to decompress the upgrading package, it will asks you to
select the drive in which to copy the ETERE upgrade, select the folder where the previous installer is
located (new files will overwrite old ones),
2.4. In the 'ETERE Configuration | Settings | Etere Installation' module you can see the complete list
of installation files. You can check all the PC's where ETERE is installed, which ones have or have not
been updated from the files inside the network installation. 3. Upgrade Non-Automation PC's
3.1. Please note that the MAIN Automation PC does not need to be stopped to update all other PC's
(Non-Automation PC's), whilst ETERE STMAN may stop itself during the database maintenance
process. 3.2. Close all open ETERE applications on the PC (e.g.: the Scheduling PC, Recording PC, etc)., taking
care to also close any background modules (e.g. Control Panel, Sarvaji, Time Flooder, FTP Server,
etc). 3.3. If the file 'etsnmpagent.dll' needs to be updated, the upgrading program closes SNMP, updates it and
relaunches it automatically requesting only confirmation for installing the new 'dll'. 3.4. Run the 'Start | Programs | Etere | Setup | Update Workstation' application, enter the path to the
folder in which the upgrade files have been decompressed, and click on the 'update' button, this action
will locally update the PC. 3.5. Run the 'Etere Configuration | System Maintenance' module checking the 'Check database structure',
'Check archive database structure' and 'update screen language' options. 3.6. While this rather lengthy process is running on the current PC, you can launch the 'Update
Workstation' application on all the other PC's except Main and Clone Automation (for those cases
follow the indications described in the next point). 4. Upgrade Main/Clone Automation PC's
4.1. If no Clone Automation exists, the operator should insert a tape on-air to cover the time while Automation stops and jump to the point 4.4. 4.2. Instead, If a Main and Clone Automations exists, stop on the Clone PC the Automation, Aligner and Stman (if present) modules and update it as described in the point three (3). 4.3. Wait until the update is complete, after then restart the Clone Automation and switch it ON, so the system will run in Clone Mode, freeing up the Main Automation. 4.4. Stop on the Main PC the Automation, Aligner and Stman (if present) modules and update it as described in the point three (3). 4.5. Wait until the update is complete, then restart the Main Automation and switch it ON. 5. Verify the Upgrade
5.1. Check in the 'ETERE Configuration | Settings | Etere Installation' module that all files have been
updated on each PC,
5.2. Verify that the new version of ETERE is working properly on each PC by opening and testing severalapplications (e.g. Presentation Editor, Asset Form, etc). 5.3. Publish a schedule as a final test.
Purpose
The purpose of this chapter is to guide the TX manager through the security design of its network. Nowadays any broadcasting system is based on networks, and these networks must be protected in order to guarantee the level of service of a broadcasting facility.
Isolated but Connected
The best idea to make a secure TX network is to isolate it, but today this is not possible because Schedules and Assets arrives as files from external agencies, demonstrating that the tapeless concept is everywhere. In this terms a secure network must be isolated from unauthorized entities but connected to reliable networks at the same time, this seems to be a non-sense but achieving this goal, TX managers will have a network improved with proper access restrictions.
External Connections
Analyzing the structure of a network implemented into a TX facility, we will find the following connections:
· Corporate IT: To receive schedules, send as run logs or connect traffic clients,
· Corporate IT: To expose its web interface,
· Post Production: To send and receive video files,
· Internet: To receive video files from outside,
· Internet: To receive necessary software updates,
· Etere Support: To receive customer assistance. It seems that a TX facility must be connected to the entire world and it is true, today a TX facility must be
tapeless to manage the information according to the current technologies while taking care of an important aspect: improving its security. Improve the security of a TX facility consists in the identification of how many networks are included on it,
normally it is composed by only one network and sometimes by two (a Control-Network and a Video-Network), the first case is the one that experts recommend whilst the latter case indicates a bad network design.
Users
In the practice, there are lots of users defined within a network, some are operators, and others are automatic systems (e.g.: automation, data movers, etc); each one of them must perform specific operations, it's advisable to identify each operation in order to restrict the access such in a way that each user will be enabled to only use the resources that are intended to be managed by him, in this way the network will increase its level of security and will be more easy to be monitored.
Necessary Updates
Windows and other software vendors release lots of updates to improve systems and especially their security; those updates MUST be installed because they are very important for the security of the whole system. But in which way a TX manager can update a system without using a direct and unsafe connection, that's why Microsoft delivers an update server which name is WSUS (Windows Server Update Services). WSUS is the application that provides a software update service for Microsoft Windows operating systems and other Microsoft software, by using WSUS, administrators can manage the distribution of Microsoft hot fixes and updates released through Automatic Updates to computers in a corporate environment.
You can find more info on http://technet.microsoft.com/en-us/wsus/default.aspx
· Inside: It is the TX network, where everything is safe and controlled, where unauthorized access is not allowed. · Outside: This is everything dangerous in the intranet outside TX; normally it is the corporate intranet. · DMZ: In computer security, it is a demilitarized zone, named after the military usage of the term and normally abbreviated to DMZ; also known as a Data Management Zone or Demarcation Zone or Perimeter Network, is a physical or logical sub network that contains and exposes an organization's external services to a larger, untrusted network, usually the Internet. The purpose of a DMZ is to add an additional layer of security to an organization's Local Area Network (LAN);an external attacker only has access to equipment in the DMZ, rather than the whole of the network. · Internet: the insecure public network. · VPN : Virtual Private Network, protected by 3des encryption is used by ETERE for support purposes. · Public IP Address: A unique IP address in internet.
Microsoft WSUS
WSUS (Windows Security Updates Service) is necessary to ensure that your OS will be updated without exposing your Pc to internet, WSUS is easy to install, simple to configure and not difficult to maintain.
Anti-Virus
Anti-Virus systems do not allow a real-time operation; sometimes they slow down software accesses, so they cannot be installed in all real-time connected systems, as automation or operators editors. A regular scan of the entire network must be performed by a dedicated machine, to ensure no virus was inside the network; instead, Anti-Virus can be installed in all not real-time related machines as Air Sales, MAM or Scheduling.
USB
USB ports must be disabled everywhere, the USB activation must be done only when really necessary, and by the system administrator. No file movement must be allowed via USB, if a USB connection must be required, it must be considered unsafe, so the Pc that hosts the USB connection must be vulnerable to the outside.
Services
All the services provided to the Outside network by a TX must be placed on DMZ, to allow the necessary safety to the outside world; this process has an impact on performances, but it's the only procedure to be safe that all the I/O cannot carry unwanted actions. Even today, security elements such as passes, guards, doors, locks has a cost in term of performances, because you spent time to move from one place to another, but this is necessary to guarantee the service level. If anyone without control can go into your master control room, it will be too easy to put the station on black every day, so everyone must agree that protection cost money and time, processes are a little slower but safe.
Users
A TX network has a lot of users defined on it, some are operators, and others are automatic systems
such as automation or data movers. Each one of them must perform specific operations, it is advisable to
identify each operation and restrict the access to each user to only the resources he needs to manage. In
this way, an appropriate users-list must be prepared with the username and password for them. Username and password must be changed at least every 3 months even for automatic processes, this
costs time but improves considerably the network's security.
Suggested network connection
There are hundreds of possible solutions for the network security problem; Etere, based on experiences, tries to give a general example which is also a good compromise between costs, management, performances, the following diagram could be a good example:
Using a multiple port firewall it's possible to:
· Isolate the corporate network from the TX network
· Give services to external network with a good security level.
· Receive updates
· Receive video files
· Receive scheduling and send as run logs. It's important to identify the procedures present in this scenario:
· Every file delivered Inside the TX network needs to arrive via FTP (only) to the FTP server in the DMZ zone.
· On the FTP there is an antivirus that scans it and then sends it inside.
· This is also the workflow for scheduling; ingest lists and any other file.
· No file can arrive without the previous control.
· The same firewall can be used to create the VPN for Etere support.
IT knowledge
In the practice, a TX group has both Video and SDI Knowledge, but they must acquire also IT Knowledge.
It is not possible for them rely to the standard IT organization because a broadcasting system requires a special knowledge.
For example you can wait 5 seconds to retrieve an e-mail but 5 seconds of black on video is a disaster, so it is necessary that IT knowledge is created inside the TX group, so they can manage the entire network with the special IT environment for broadcast.
Redundancy
In the market exists several hardware redundancy firewalls, but all those appliances are quite expensive.
An economical alternative is to have 2 hardware units (redundancy concept); where one will be used as cold stand by, this because that unit will not be used for the On-Air so it can accept some downtime.
The Far users are those clients who do not login in the TX domain by using the win32 interface; but by using a web interface. Those clients normally need to do a massive data entry or playlist control, so the web interface is not the best for them. To provide them a comfortable environment and at the same time a good security service, the TX manager could implement one of the following options:
· Good Performance WAN,
· Poor Performance WAN.
Good performance WAN
If the Wan has a good performance, clients can perform a login by using the internal ETERE Login, their Pc will access only the SQL data with an authentication mode enabled only for ETERE. With this option, no other process (virus) can access the sql data, and you can also use a port mapping on the firewall to avoid using the standard SQL port. All other data, as video streaming will be access using the WAN address translation capability of ETERE, that is the most Wan enabled system on the market.
Poor performance WAN
The TX manager can implement a Remote Access Server provided by Microsoft Server to allow remote uses to open different sessions on the remote access server. This process will use less bandwidth and it will have a good performance even with 64k only, and if the network connection is lost the process retain all the data. In the other hand, multimedia performances will be poor because in order to stream audio and video over the Wan, more servers and Microsoft licenses will be required.
On the installation CD, you will find the SETUP.Msi in the \Etere directory. This setup file is able to perform the installation on your PC which can be launched from the top CD menu and will guide you through an easy-tofollow process to carry out the installation of the Etere's software. If you wish to create a shared installation directory, go to advanced installation. Furthermore, remote users can be installed from the same Etere CD, and any update can be carried out also form it, this will simplify the installation and update process over slow WAN lines. Microsoft SQL Server Installation Since ETERE System uses a database approach to store and manage safely all the broadcasting data, it is needed to have Microsoft SQL and the latest windows service pack installed on the PC before installing Etere, the recommended versions are Microsoft SQL Server 2005 or 2008 (Express, Workgroup, Standard or Enterprise edition), the most important differences and limitations between each edition in terms of scalability, performance and manageability can be appreciated in the Microsoft's related page. You are always free to contact the Etere support team, who will help you to determine which edition of Microsoft SQL is better for your system. How to Install Microsoft SQL Server 2005 Express Edition In order to install Microsoft SQL Server 2005 Express Edition you must have Administrator rights and the following software must be already installed: · .NET Framework 2.0 (You can use Control Panel > Add/Remove Programs to see your .NET Frameworkversion) · Windows Installer 3.1 (To check your Windows Installer version, click Start > Run. Then type: msiexec /?) 1. On the Etere CD that you have received, you can find a free redistribution version of Microsoft SQL Server 2005 Express Edition (SQLEXPR.EXE), double-click it to begin the installation. Required installation files will be unpacked before installation commences. 2. Accept the licence agreement then click 'Next'. Required setup support files will be installed after clicking on 'Install' in the Installing Prerequisites window. 3. Click Next to continue. SQL Server Setup will scan your PC for existing installs and will present you with a Welcome screen. Click Next again to proceed. 4. In System Configuration Check click 'Next' once this has finished. 5. Enter your registration information and then click Next, from the feature selection list make sure Database Services is selected for installation. 6. Etere doesn't require the additional features to be installed. Click Next to continue. 7. You should now choose an instance name for the database server. You can leave this as the default 'SQLEXPRESS' or choose an instance name of your own, for example the name of your Broadcasting Station. Click Next to continue. 8. Now choose the authentication type. This relates to the database logon authentication, not ETERE user authentication. After choosing the authentication method here, ETERE can be installed using either method, but if you use Mixed Mode authentication you will need to make a note of your chosen 'sa' password. For ease use Windows Authentication Mode. Click Next to continue. 9. Optionally enable error and usage data reporting, then click Next to continue. 10. Click Install to begin installation. Files will be installed, you'll see green checkmarks next to each component as it installs successfully. If the installation is successful you will see the screen shown below. Click Next to continue. 11. In the Setup Progress window, click Next then Finish to end the installation process. Your database server is now installed and ready to be used with ETERE. 12. When restarting the computer, for checking if the SQL service works just open the Microsoft SQL Server 13. After you have installed Microsoft SQL Server 2005, you need to create a new database. This database will be used to archive all data and information groups by tables necessary for Etere to work. You can create this database using the utility Microsoft SQL Server Management Studio, just by making right-click on the 'Databases' item from the options tree, selecting 'New Database', giving it a name and after clicking OK the database will be created. 14.Once all these steps have been completed, Microsoft SQL Server will be ready to be used with Etere.
Etere's install application is based on MSI (Microsoft Windows Installer). The installer associates Etere's modules to functions and contains information of the installing process, such as the installing sequence, the folders' destination paths, the system dependences, the options to install, and some features to check the installation process. Even after the installation, the installer is still used by Windows each time you add/remove modules or repair damaged or absent files. In order to install Etere software, you need to launch the Setup.exe application, select the proper option, and follow the procedures below: Etere Installation 1. Select the 'Etere Installation' option, and 'accept the terms in License Agreement', after then click on the 'Next' button, 2. Define the installation folder (e.g.: C:\PROGRAM FILES\ETERE\), and select the modules you want to be installed: 3. Click on the 'Next' button and all Etere files will be copied from the network folder (e.g.: \\NetworkPath\ETERE\SYSTEM\) to the specified installation folder. 4. Once the installation has finished, launch the 'Start | Programs | Etere Configuration' module and follow the instructions until the form shown on the picture 'New Licenses installation' appears 5. You will have to browse Etere's software license. If you can't find the folder on the Etere installation CD- Rom, use the floppy disk containing the license file. In this case you must select the drive A: to the item Path and select the file 'licenseX.sys'. 6. Once the license has been installed, the next step is to configure the parameters of the database in Etere, in order to carry out this process follow the next instructions: · Launch again the 'Start | Programs | Etere Configuration' module, then select 'Settings -> System' option and set the following parameters: - SQL Server, it is the name of the server on which the database is stored, - Database, indicate the name of the database to be used, - Authentication, it could be either Windows (it's advised if the system has no WAN connection and the security requirements are not very strict) or SQL (if the system is connected to a WAN Network, this method gives better security even if it's more difficult to maintain). - Language, select the language you intend to use (in case it is an Unicode language, please consult the How to use Etere with Unicode Languages chapter). After modifying the parameters, restart Etere Configuration. · Before starting to work with Etere, is strongly recommended to run System maintenance option. This function is available in the main menu of the Etere Configuration module and it creates all the tables needed to run Etere. Features Installation Use this option to install any of the web services offered by Etere (e.g.: 'Etere Web', 'Tapeless Reception', etc) and that you are licensed to use. In order to install one or more of these services, just tick-off the relative checkbox and click on the 'OK' button
The steps to configure and use Etere with Unicode Languages are listed below: 1. Install the desired Unicode language on the PC: · Click on START | Settings | Control Panel | Regional and language options, · In the Languages section, enable "Install file for complex script and right-to-left languages (including Thai)" or "Install file for East Asian languages" on the basis of the language you want to use. 2. Add the keyboard in the desired language from "Text services and input languages", 3. Select the desired language under Etere Configuration, 4. Check that the keyboard used is in the language that you need when you're using Etere. NB: All the information above concerns Microsoft Windows XP.
Upgrading your Etere System Etere counts with a professional staff of engineers which constantly works to develop a cutting-edge software according to the latest needs of the broadcasting industry, in this way, Etere is able to offer to its customers the most recent updates of its product, that can be download from the Etere's website and easily installed by customers themselves. Upgrading an Etere system is a sensitive process, so remember that an upgrade should be performed only if version 19.x of ETERE is currently installed on your system, otherwise it may crash. If it is not your case, because you have an earlier version of Etere, please feel free to contact our Customer Support that will be able to help you with any question you have. Step-By-Step Procedure The upgrade instructions described below will provide you with a walk-through that will assist in upgrading the ETERE Software, this upgrade requires approximately two hours of time to download the needed files and another hour for installing all the required components; the following steps needs to be followed for a successful upgrade of your ETERE software: 1. Prepare your System 1.1. Identify the SQL Server version to check its compatibility with ETERE, including the service pack level required. The SQL version can be checked in the 'ETERE Configuration | Help | About |Properties' window. 1.2. If the SQL version does not meet the suggested requirements, update it. 1.3. Identify the Operating System, Framework version and service pack level of each PC to check its compatibility with ETERE. This can be checked in the 'ETERE Configuration | Settings | Etere PC's' window. 1.4. Runs Windows Update in all PC's that do not meet the recommended requirements for Operating System and Framework version, 1.5. Identify all PC's where ETERE is installed. This can be done in 'ETERE Configuration | Settings | Etere Installation', 1.6. Make a list of all PC's that need to be updated, and create a backup copy of the existing ETERE system folder. 1.7. Determine all the changes that have been made between your current ETERE version and the new one following the next procedure: 1.7.1. Launch from the ETERE network folder the file 'eterever.exe' (e.g.: '[networkpath\ETERE\SYSTEM\eterever.exe'). 1.7.2. Select the ETERE network folder (e.g.: '[networkpath]\ETERE\SYSTEM\eterever.exe') path and press he 'Generate Version History' button, 1.7.3. A file named 'version.txt' will be generated in the given location and all executable and DLL information will be listed in it. 1.7.4. Send this file (version.txt) to support@etere.eu specifying that you wish to have a report on all relevant changes for comparison. 1.7.5. Etere's support team will send you a report containing the changes between your current version and the new release detailing the new features that an upgrade will bring to your system. 1.8. Make a backup of your database (see the SQL Database Backup chapter for further information). 2. Download the Upgrade 2.1. Enter the Customer Area of the ETERE website (www.etere.eu), and insert your login data (only customers who have paid the annual licence fee are allowed to download upgrades). 2.2. From the list to the left of the screen click on the 'Software Upgrades' option and select the 'Download ETERE full upgrade' to download the file containing the latest version (EtereLast.exe), 2.3. Make double-click on the file 'EtereLast.exe' to decompress the upgrading package, it will asks you to select the drive in which to copy the ETERE upgrade, select the folder where the previous installer is located (new files will overwrite old ones), 2.4. In the 'ETERE Configuration | Settings | Etere Installation' module you can see the complete list of installation files. You can check all the PC's where ETERE is installed, which ones have or have not been updated from the files inside the network installation. 3. Upgrade Non-Automation PC's 3.1. Please note that the MAIN Automation PC does not need to be stopped to update all other PC's (Non-Automation PC's), whilst ETERE STMAN may stop itself during the database maintenance process. 3.2. Close all open ETERE applications on the PC (e.g.: the Scheduling PC, Recording PC, etc)., taking care to also close any background modules (e.g. Control Panel, Sarvaji, Time Flooder, FTP Server, etc). 3.3. If the file 'etsnmpagent.dll' needs to be updated, the upgrading program closes SNMP, updates it and relaunches it automatically requesting only confirmation for installing the new 'dll'. 3.4. Run the 'Start | Programs | Etere | Setup | Update Workstation' application, enter the path to the folder in which the upgrade files have been decompressed, and click on the 'update' button, this action will locally update the PC. 3.5. Run the 'Etere Configuration | System Maintenance' module checking the 'Check database structure', 'Check archive database structure' and 'update screen language' options. 3.6. While this rather lengthy process is running on the current PC, you can launch the 'Update Workstation' application on all the other PC's except Main and Clone Automation (for those cases follow the indications described in the next point). 4. Upgrade Main/Clone Automation PC's 4.1. If no Clone Automation exists, the operator should insert a tape on-air to cover the time while Automation stops and jump to the point 4.4. 4.2. Instead, If a Main and Clone Automations exists, stop on the Clone PC the Automation, Aligner and Stman (if present) modules and update it as described in the point three (3). 4.3. Wait until the update is complete, after then restart the Clone Automation and switch it ON, so the system will run in Clone Mode, freeing up the Main Automation. 4.4. Stop on the Main PC the Automation, Aligner and Stman (if present) modules and update it as described in the point three (3). 4.5. Wait until the update is complete, then restart the Main Automation and switch it ON. 5. Verify the Upgrade 5.1. Check in the 'ETERE Configuration | Settings | Etere Installation' module that all files have been updated on each PC, 5.2. Verify that the new version of ETERE is working properly on each PC by opening and testing severalapplications (e.g. Presentation Editor, Asset Form, etc). 5.3. Publish a schedule as a final test.
Preface Purpose The purpose of this chapter is to guide the TX manager through the security design of its network. Nowadays any broadcasting system is based on networks, and these networks must be protected in order to guarantee the level of service of a broadcasting facility. Isolated but Connected The best idea to make a secure TX network is to isolate it, but today this is not possible because Schedules and Assets arrives as files from external agencies, demonstrating that the tapeless concept is everywhere. In this terms a secure network must be isolated from unauthorized entities but connected to reliable networks at the same time, this seems to be a non-sense but achieving this goal, TX managers will have a network improved with proper access restrictions. External Connections Analyzing the structure of a network implemented into a TX facility, we will find the following connections: · Corporate IT: To receive schedules, send as run logs or connect traffic clients, · Corporate IT: To expose its web interface, · Post Production: To send and receive video files, · Internet: To receive video files from outside, · Internet: To receive necessary software updates, · Etere Support: To receive customer assistance. It seems that a TX facility must be connected to the entire world and it is true, today a TX facility must be tapeless to manage the information according to the current technologies while taking care of an important aspect: improving its security. Improve the security of a TX facility consists in the identification of how many networks are included on it, normally it is composed by only one network and sometimes by two (a Control-Network and a Video-Network), the first case is the one that experts recommend whilst the latter case indicates a bad network design. Users In the practice, there are lots of users defined within a network, some are operators, and others are automatic systems (e.g.: automation, data movers, etc); each one of them must perform specific operations, it's advisable to identify each operation in order to restrict the access such in a way that each user will be enabled to only use the resources that are intended to be managed by him, in this way the network will increase its level of security and will be more easy to be monitored. Necessary Updates Windows and other software vendors release lots of updates to improve systems and especially their security; those updates MUST be installed because they are very important for the security of the whole system. But in which way a TX manager can update a system without using a direct and unsafe connection, that's why Microsoft delivers an update server which name is WSUS (Windows Server Update Services). WSUS is the application that provides a software update service for Microsoft Windows operating systems and other Microsoft software, by using WSUS, administrators can manage the distribution of Microsoft hot fixes and updates released through Automatic Updates to computers in a corporate environment. You can find more info on http://technet.microsoft.com/en-us/wsus/default.aspx
Acronyms · Inside: It is the TX network, where everything is safe and controlled, where unauthorized access is not allowed. · Outside: This is everything dangerous in the intranet outside TX; normally it is the corporate intranet. · DMZ: In computer security, it is a demilitarized zone, named after the military usage of the term and normally abbreviated to DMZ; also known as a Data Management Zone or Demarcation Zone or Perimeter Network, is a physical or logical sub network that contains and exposes an organization's external services to a larger, untrusted network, usually the Internet. The purpose of a DMZ is to add an additional layer of security to an organization's Local Area Network (LAN);an external attacker only has access to equipment in the DMZ, rather than the whole of the network. · Internet: the insecure public network. · VPN : Virtual Private Network, protected by 3des encryption is used by ETERE for support purposes. · Public IP Address: A unique IP address in internet. Microsoft WSUS WSUS (Windows Security Updates Service) is necessary to ensure that your OS will be updated without exposing your Pc to internet, WSUS is easy to install, simple to configure and not difficult to maintain. Anti-Virus Anti-Virus systems do not allow a real-time operation; sometimes they slow down software accesses, so they cannot be installed in all real-time connected systems, as automation or operators editors. A regular scan of the entire network must be performed by a dedicated machine, to ensure no virus was inside the network; instead, Anti-Virus can be installed in all not real-time related machines as Air Sales, MAM or Scheduling. USB USB ports must be disabled everywhere, the USB activation must be done only when really necessary, and by the system administrator. No file movement must be allowed via USB, if a USB connection must be required, it must be considered unsafe, so the Pc that hosts the USB connection must be vulnerable to the outside. Services All the services provided to the Outside network by a TX must be placed on DMZ, to allow the necessary safety to the outside world; this process has an impact on performances, but it's the only procedure to be safe that all the I/O cannot carry unwanted actions. Even today, security elements such as passes, guards, doors, locks has a cost in term of performances, because you spent time to move from one place to another, but this is necessary to guarantee the service level. If anyone without control can go into your master control room, it will be too easy to put the station on black every day, so everyone must agree that protection cost money and time, processes are a little slower but safe. Users A TX network has a lot of users defined on it, some are operators, and others are automatic systems such as automation or data movers. Each one of them must perform specific operations, it is advisable to identify each operation and restrict the access to each user to only the resources he needs to manage. In this way, an appropriate users-list must be prepared with the username and password for them. Username and password must be changed at least every 3 months even for automatic processes, this costs time but improves considerably the network's security. Suggested network connection There are hundreds of possible solutions for the network security problem; Etere, based on experiences, tries to give a general example which is also a good compromise between costs, management, performances, the following diagram could be a good example: Using a multiple port firewall it's possible to: · Isolate the corporate network from the TX network · Give services to external network with a good security level. · Receive updates · Receive video files · Receive scheduling and send as run logs. It's important to identify the procedures present in this scenario: · Every file delivered Inside the TX network needs to arrive via FTP (only) to the FTP server in the DMZ zone. · On the FTP there is an antivirus that scans it and then sends it inside. · This is also the workflow for scheduling; ingest lists and any other file. · No file can arrive without the previous control. · The same firewall can be used to create the VPN for Etere support. IT knowledge In the practice, a TX group has both Video and SDI Knowledge, but they must acquire also IT Knowledge. It is not possible for them rely to the standard IT organization because a broadcasting system requires a special knowledge. For example you can wait 5 seconds to retrieve an e-mail but 5 seconds of black on video is a disaster, so it is necessary that IT knowledge is created inside the TX group, so they can manage the entire network with the special IT environment for broadcast. Redundancy In the market exists several hardware redundancy firewalls, but all those appliances are quite expensive. An economical alternative is to have 2 hardware units (redundancy concept); where one will be used as cold stand by, this because that unit will not be used for the On-Air so it can accept some downtime.
What are Far users The Far users are those clients who do not login in the TX domain by using the win32 interface; but by using a web interface. Those clients normally need to do a massive data entry or playlist control, so the web interface is not the best for them. To provide them a comfortable environment and at the same time a good security service, the TX manager could implement one of the following options: · Good Performance WAN, · Poor Performance WAN. Good performance WAN If the Wan has a good performance, clients can perform a login by using the internal ETERE Login, their Pc will access only the SQL data with an authentication mode enabled only for ETERE. With this option, no other process (virus) can access the sql data, and you can also use a port mapping on the firewall to avoid using the standard SQL port. All other data, as video streaming will be access using the WAN address translation capability of ETERE, that is the most Wan enabled system on the market. Poor performance WAN The TX manager can implement a Remote Access Server provided by Microsoft Server to allow remote uses to open different sessions on the remote access server. This process will use less bandwidth and it will have a good performance even with 64k only, and if the network connection is lost the process retain all the data. In the other hand, multimedia performances will be poor because in order to stream audio and video over the Wan, more servers and Microsoft licenses will be required.